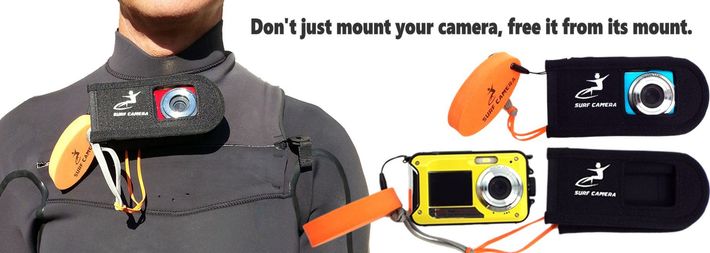
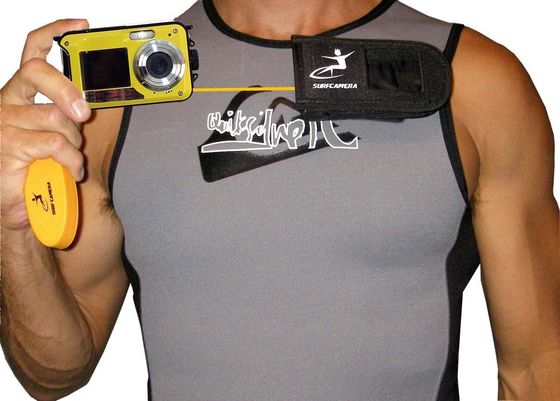
Surf Camera case Directions

Directions: (approximately 10 minutes) Way less time than hooking up a GoPro!
- The best location on your wetsuit for the 2-¼ inch squared attachment is on the top edge centered approximately 1 inch below the sewn stitch of the neck’s (center) collar. You want it high on the center of your chest. For tank-top vests, the best location is approximately ¼ inch below the sewn stitch of the neck (also center of the chest).
- While holding the square attachment in place on the front side of your wetsuit, place a nail or an ice pick through one of the screw holes (either side) of the female attachment to poke a pinhole thru the wetsuit. On the inside of your wetsuit mark around the nail before you pull it out so you can find it for the next step.
- Take the back-plate part of the square attachment, place one of the stainless steel screws thru it, then from the inside of your wetsuit push that screw thru the nail mark you just made. The pin hole will be very small so you might have to stretch the wetsuit area to find it then screw it thru.
- Do the same for the opposite hole of the attachment.
- Now place the female square attachment on the front side of the wetsuit over the screws.
- Secure it with the provided stainless steel nuts and do not over-tighten.

- Now place the case onto the female attachment at 90 degrees and rotate into place.
- Using the lanyard that comes with your camera, attach it onto your camera first then pull the lanyard rope thru the hole of the orange grip float support. (You can use a paperclip by bending it in shape and pull it thru the float grip hole.) Pull the lanyard all the way thru so that the orange float grip is as close to the camera as possible.
- Tie a knot on the outside of the float grip as close as you can get to it. You should have extra lanyard hanging on the outside of the float grip.
- Take the orange elastic band put it thru the excess lanyard then pull the camera assembly thru it. Now everything is looped together.
- While wearing your wetsuit or top, place your camera at a slight angle to the opening of the Surf Camera case so that the top corner of the camera is in first then slip the camera in quickly so that it’s fully past the beads at the inside opening of the case.
- The case will collapse around your Surf Camera and make it secure even on good wipeouts!
You’re ready to Surf-N-Shoot!!!
Tips:
1) Always check your gear for wear & security before your surf session.
2) Quickly eject your camera from the case by snapping your wrist back as you pull.
3) For user tips or inputing tips of your own, check out our forum at SurferShot.
MAKE SURE YOU PLACE YOUR CAMERA ALL THE WAY IN PAST THE INSIDE BEAD LOCKS BEFORE YOU DUCKDIVE OR SURF!
– If you’re too late bail your board and hold onto your camera (the expandable elastic band is in place in case you drop it.)
– If you’re too late bail your board and hold onto your camera (the expandable elastic band is in place in case you drop it.)
Battery Door Instructions:
There is a rubber thimble provided to help open the Surf Camera’s battery door as it can be difficult to open (as it should be). After each ocean use, rinse the camera with fresh water. When dry open the battery door and slide it back and forth to work out any salt grind trapped inside. When you close the battery door work the door lock side to side until the spring-load snaps back on its own.
The metal door slide just inside the battery door may need a drop of WD40 from time to time. To do this place a drop of WD40 onto a Q-tip and coat the metal part of the door slide near the hinge. Be careful not to get any on the rubber door seal.
Make sure there is no dust, sand, oils or water inside the rubber door seal. It is VERY important to make sure the door, rubber seal, and battery compartment are squeaky clean!!!
Go to SurferShot.com and upload your surfer shots! We'd love to see them… And give feedback!

