
Ski Camera case Mounting Directions

Directions: (approximately 3 to 5 minutes)
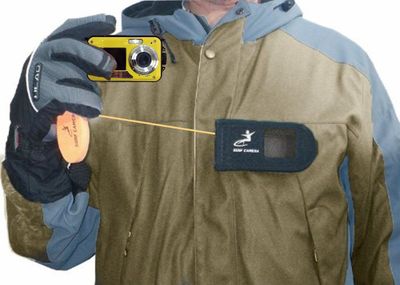
- The recommended location for the 2 ¼” squared attachment is having it at the left side of your chest area.
- Place the female square attachment with the case attached on to the left chest area of your jacket so the open end of the case is either even with the center of your chest or over laping it. Find a marker to mark across the bottom of the female attachment. Make sure your mark is horizontal and straight. This does not have to be perfect.
- Place the female attachment (case unattached) where you made your mark and use a nail or an ice-pick to punch a small hole through your jacket from the outside, where one of the screw holes are (either side) of the female attachment. On the inside of your jacket mark around the nail before you pull it out (so you know where the hole is).
- Take the back -plate part of the attachment, place one of the screws thru it, then from the inside of your jacket push that screw thru the nail mark you just made. The hole will be very small so you might have to pull the hole you made wider as you push the screw threw.
- Place the female attachment over your screw you just pushed thru on the outside and secure it with the nut without tightening it down yet.
- Align the female attachment with your mark and poke the nail through the other screw hole of the attachment, and follow steps 3 and 4.
- Secure it down with the 2 nd nut and tighten both nuts. Do not over tighten.
- Now place the case onto the female attachment at 90 degrees and rotate into place.
- Using the lanyard that comes with your camera, attach it onto your camera first then pull the lanyard rope thru the hole of the orange grip float support. (You can use a paperclip by bending it in shape and pull it thru the float grip hole.) Pull the lanyard all the way thru so that the orange float grip is as close to the camera as possible.
- Tie a knot on the outside of the float grip as close as you can get to it. You should have extra lanyard hanging on the outside of the float grip.
- Take the orange rubber band put it thru the excess lanyard then pull the camera assembly thru it. Now everything is looped together.
You’re ready to Ski-N-Shoot!!!
Tips:
1) Always check your gear for wear & security before your ski session.
2) Make the lanyard as short as possible - so the float hand grip is has close as it can be to the camera.
3) Quickly eject your camera from the case by grabbing the orange float and snap your wrist back as you pull.
MAKE SURE YOU PLACE YOUR CAMERA ALL THE WAY IN PAST THE INSIDE BEAD LOCKS!
– This keeps your camera locked into place until you need it.